Print position
Print position refers to where the image is placed on the printed page. On digital duplicators, the print position can be adjusted after a stencil has been made, either with directional arrow buttons or with mechanical adjustments on the feed tray (for some older models).
Print position is a translation along two axes (for rotation, see Skew).
Adjustment
Print position must be adjusted relative to the orientation of the printed sheet (not the orientation of the image on the sheet). So position changes should be based on how the page comes out of the riso, not which way the actual finished image should be turned.
Print positioning is handled in different ways for 2-button (left/right) and 4-button (full directional pad) machines.
| 2-button | 4-button | |
|---|---|---|
| Left/right | All risographs control the left and right print positioning with a pair of directional buttons on the main control panel. Adjustments along this axis change the timing of when the paper is fed to the spinning drum. Moving the print position to the left will cause the paper to feed earlier, so that the image starts printing further down the page. Moving the print position to the right will cause the paper to feed later, so that the image hits it closer to the lead edge. | |
| Up/down | Lower-model and older machines only have the two left/right buttons (they are referred to as "2-button" machines). Up/down adjustments use an analog positioning system with a small green or blue plastic wheel on front edge of the paper feed tray. Turning the wheel "up" (clockwise) will move the image up, while turning it "down" (counterclockwise) will move the image down. The distance shift is 1:1, but small markings on the feed tray, near the dial, can help with measurement. This wheel is changing the position of the whole paper feed tray forward and back, while the drum remains stationary. Moving the paper backwards (up) will cause the image to print more forwards (down), and vice versa. |
Higher-model machines (and all two-drum machines) use full digital positioning, with a "4-button" directional pad. Up/down buttons can be used to shift the print position up and down. In these models the paper fed tray is stationary, but the drum itself moves forwards and backwards in the machine. |
There are two systems to control print position while printing: digital positioning, and manual positioning. Which is used depends on the model of the machine.
- Digital positioning uses arrow keys on the control panel to move the print—each button click will move the image a set unit in a cardinal direction on subsequent prints. All duplicators have digital control on the left/right axis (along the length of the paper path) by changing the timing of the paper reaching the drum. Higher level models also also have digital control in the up/down axis by moving the drum itself forward and back in the riso.
- Manual positioning is used in older and more limited models to adjust the up/down print positioning. It functions by turning a dial on the paper feed tray that moves the whole stack of paper forward and back. Moving the paper backwards (up) will cause the image to print more forwards (down), and vice versa. The distance shift is 1:1, but small markings on the feed tray, near the dial, can help with measurement.
-
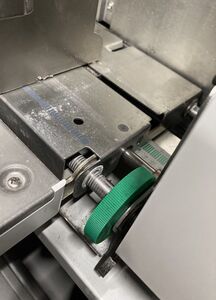
The green up/down positioning dial on the feed tray of a
 3770—this one is set a little past the center position (resulting in the image slightly lower on the page).
-
![The right side of an control panel—with the positioning buttons marked. This is a 4-button model, print position can be adjusted in all 4 directions with the directional-pad buttons.[1]](/w/images/thumb/1/16/MZ770_User_Guide-23.jpg/300px-MZ770_User_Guide-23.jpg)
The right side of an
 control panel—with the positioning buttons marked. This is a 4-button model, print position can be adjusted in all 4 directions with the directional-pad buttons.[1]

![The right side of an control panel—with the positioning buttons marked. This is a 4-button model, print position can be adjusted in all 4 directions with the directional-pad buttons.[1]](/wiki/File:MZ770_User_Guide-23.jpg)
Units
For digital adjustment, most risographs will, by default, move the printed image 0.5 mm with each button click, regardless of whether the riso is set to metric (mm) or imperial (in). When set to imperial, the riso will simply round the displayed value to the nearest 64th of an inch. For this reason, many operators set their machines to metric, as the readout is more accurate.
| Metric (mm) | 0 | 0.5 | 1.0 | 1.5 | 2.0 | 2.5 | 3.0 |
|---|---|---|---|---|---|---|---|
| Imperial (in) | 0 |


Fine adjust mode
The highest model risos have an optional setting called fine adjust mode which changes the fidelity of digital positioning. With fine adjust mode enabled, the movement per click changes from 0.5 mm to 0.1 mm.
For risographs that have this option (usually those with touch screens) it can be enabled by changing the value of test mode 168 to 1.
Methods
Print position can be set in two methods, and depending on what's being printed, either can work. The following list includes patterns of use for each.
- Absolute—where each color layer is adjusted to line up to the paper, a fixed (absolute) reference. By using a single reference, slight variance in each layer (which comes from misregistration, which all duplicators have some degree of) averages out across a run, making the overall positioning more regular. This is essential for anything which is going to be folded (i.e. the pages of a book or a zine) or cut down based on the paper size (i.e. a 2-up or n-up layout). Absolute positioning requires some kind of registration mark
- Registration marks are included at the center line along each edge of the paper. The proof print is folded in half each way, then positioning is adjusted so that each mark lands on the fold.
- Registration marks are placed in each corner of the print. Each is measured on the proof print to the edges of the paper, and position is adjusted to ensure equal spacing all the way around.
- If there is no slugThe portion of the sheet that will be trimmed off area for registration marks, they can be hidden in the spine of a fold (often under the staples or the sewing).
- For prints with no slug area, a reference point in each layer can be measured to the edges of the sheet, or a full-scale mockup can be generated to align to.
- Relative—where each color layer is adjusted to line up relative to each other. This method is inexact, but is faster, and can work for individual prints that are being cut down based on crop marks, or whose position on the page doesn't have to be exact. Without referencing the page though, it can be hard to tell if there are registration issues until the second layer is put down. Relative positioning can be done from a key layer, without registration marks (though they can help).
- The key layer is put down first with a high amount of overprinting (at least 5–10 sheets per additional color layer). Then each color layer is aligned to the key as it is proofed.
- Color layers are proofed individually, using a lightbox or equivalent to align the proofs with the printed sheets in-progress.
Calibration
If the print position consistently needs to be adjusted roughly the same amount, in the same direction (even on different drums) then the center point (AKA where things print without any adjustments) is likely out of specification. Recalibrating it will recenter things (on average) so that it only takes a few clicks (less than 1 mm) of the print position buttons to get the image properly placed.
Sometimes it’s even necessary to recalibrate, when the print position falls outside of the adjustable range—when the position adjustments are maxed out and the print still isn’t in the correct spot.
Procedure
The method for calibrating center position is different for different models of risograph.
| RPRN and Z+Any machine released with or after the RZ line, i.e. RZ/RV/EZ/EV/SF/SE and MZ/ME/MF/MH machines. | |
|---|---|
| For older machines, print position is calibrated by making mechanical corrections (changing the position of adjustable screws) in the second paper feed cams in the back of the riso. | For newer machines, print position is calibrated exclusively in test modes, changing the home position (paper feed) and/or the write start position (master making). |
| Calibrating print position on GR/FR machines | Calibrating print position on RZ+ machines |
References
- ↑ RISO KAGAKU CORPORATION. MZ770 User's Guide. Riso Kagaku (2005): 21.